Frances Ng
Frances with an "e"
Road to a short #3 - Hiroshi Nagai
Blog.
blender
geometry nodes
animated short
April 2022
It has been a very fun week. I was exploring styles for the short (keeping things going simultaneously since for other aspects I still have little clue). Grain texture is quite often used in illustration for giving that "retro" feel - and it works very nicely with saturated colors (I reckon). And it is quite straightforward to be created as a shader. Basically, it is a Voronoi textutre with fairly high scale, and combined with a color ramp will give the flexibilty of the mapped range. Instead of doing image texture, I found doing it all as procedures give more flexibility, at least at the stage of experimenting grain size.
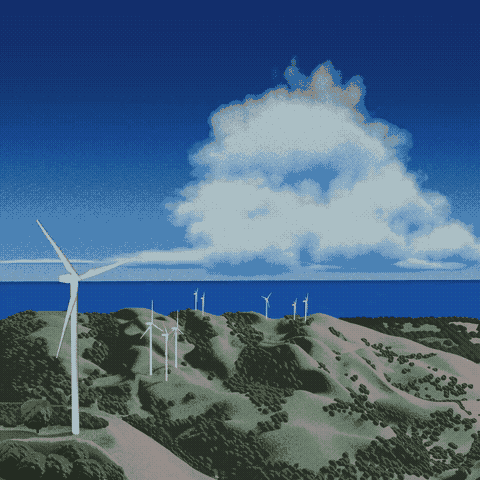
To test the style, or basically the shader techniques - the best way is probably to create a scene and see if it works lol. In the process of finding a style that I like, I came across this piece by Hiroshi Nagai (Untitled). It is a very calming yet vibrate landscape piece with wind turbines on the seaside. The saturated sky + sea are mesmerising.

Firstly, since the grain texture relies on light sources, the scene needs to be in 3d with lightings. The composition of this scene:
- Foreground: highland with brighter greens/shrubs and fluffy trees
- Midground: Mainland with detailed contours, greens/shrubs along the contours
- Background: Sky, Sea and small flat land

The Cloud is procedurally created with Gradient texture + Voronoi (same as the one I used in the shinkai makoto style inspired sky piece). I really love how blender allows you to create all these procedures that you can reuse all over again, with different parameters to suit different projects. The Sky is a very simple gradient texture, and I found myself improving in picking colors out of the blue (lol pun). For this project, I wanted to do it without doing any eye dropping with the original piece, and it turned out to be more fun(?). The experiments with colors gave me joy.
For the mainland, for once I thought maybe I should do it with geometry node by displacing the grid. I went with sculpting the plane instead, because I have a specific shape that I want to achieve. And sculpting interacts with my grain shader so well?! I have 4 level of colors for the mainland grain texture, dark + light + lighter + very low saturated. and then it really was the experimenting with the color scale all the way.
To distribute the greens across the landscape, I apply geometry nodes to specific vertex groups. It was a much better method than particle system in this case, as using particular system sort of overkill and it really slowed down the rendering a lot. Another great thing I learnt on this is that by using geometry nodes, the instance of foliage can be randomised. I have 3 different shapes with different materials for each fore/mid/background greens. The randomised shape gives more irregularity and details. This cannot be achieved by one single particle system, and using multiple would have slowed the rendering so much.
I wanted to add animation to the wind turbines to bring the wind to life. and alternating their speed harmonised the movement of the overall scene. and that's it. It really was a project to experiment with colors, and applying what I learnt so far with geometry nodes + shader in one scene. REALLY THRILLED OVER THE RENDERED RESULTS! and I added audio that I recorded some cicada during a hike recently to make it like a short summer scene.

Latest